Exploring the PageObject Pattern for Automation Testing
Are you a software tester looking to optimize your automation tests and make them more maintainable and readable? If so, then the PageObject pattern might be your secret weapon!
The PageObject pattern is a design pattern that enhances the organization and structure of your automation tests. It abstracts the user interface into separate classes or objects, making your test code cleaner, more modular, and easier to maintain. Let's explore this pattern with a simple example using Playwright and TypeScript.
In this post, I will guide you step by step, starting from scratch, on how to set up your first Playwright project. I will show you how to create a Page Object-oriented pattern and how to write your first test using a Page Object. Let's begin with the basic setup.
Step 1: Basic Setup
Node.js
First, ensure that you have Node.js installed on your workstation. Open the command prompt and execute the following command:
node -v
The result should display the version of Node.js installed on your local machine. If it does not, please install Node.js on your computer.
Playwright
For more detailed information on various methods to install Playwright on your local machine, you can refer to the documentation. However, I will demonstrate the basic approach using npm packages.
Create a Directory
To create a root directory for your project using the command prompt, follow these steps:
- Open the command prompt.
- Navigate to the location where you want to create the project directory using the
cdcommand. - Create a new directory using the
mkdircommand. For example, to create a directory named "my-playwright-project":
mkdir my-playwright-project
This creates a directory with the specified name in your current location. Navigate into it using the cd command to start setting up your Playwright project.
cd .\my-playwright-project\
Install Playwright
You can install Playwright using the npm command:
npm init playwright@latest
Follow the instructions that appear during the execution of this command to complete the installation process. If you chose not to install browsers and want to install Chromium, run the following command:
npx playwright install chromium
This installs the Chromium browser for your Playwright project.
Configure the Playwright Project
Let's perform a simple configuration for our Playwright project. Navigate to the playwright.config.ts file and make the following changes:
import { defineConfig, devices } from '@playwright/test';

export default defineConfig({
  testDir: './tests',
  fullyParallel: true,
  forbidOnly: !!process.env.CI,
  retries: process.env.CI ? 2 : 0,
  workers: process.env.CI ? 1 : 1,
  reporter: 'html',
  use: {
    trace: 'on-first-retry',
  },
  projects: [
    {
      name: 'chromium',
      use: { ...devices['Desktop Chrome'] },
    },
  ],
});
In this updated configuration file, we have simplified it by removing comments, setting a single worker for now (we will enable parallel execution later), and removing unnecessary projects. These changes make your Playwright configuration more straightforward.
Now you can run your first tests:
npx playwright test
This command executes your Playwright tests based on the configuration in the playwright.config.ts file.
Running 2 tests using 1 worker
  2 passed (10.2s)
Step 2: Page Object Pattern
Let's examine the default structure that Playwright provides out of the box. Open the ./tests/example.spec.ts file to see how a typical Playwright test is structured.
import { test, expect } from '@playwright/test';

test('has title', async ({ page }) => {
  await page.goto('https://playwright.dev/');

  // Expect a title "to contain" a substring.
  await expect(page).toHaveTitle(/Playwright/);
});

test('get started link', async ({ page }) => {
  await page.goto('https://playwright.dev/');

  // Click the get started link.
  await page.getByRole('link', { name: 'Get started' }).click();

  // Expects page to have a heading with the name of Installation.
  await expect(page.getByRole('heading', { name: 'Installation' })).toBeVisible();
});
The default test structure in Playwright has some weaknesses:
- Code Duplication — It is common to see duplicate code for interacting with the same elements across multiple tests, leading to maintenance challenges.
- Fragile Tests — If an element's locator or behavior changes, you need to update it in multiple places, making the tests more fragile and prone to breaking.
- Limited Reusability — There is limited reusability of code for interacting with elements, making it difficult to share interaction logic across tests.
This is where the Page Object Pattern comes in. It provides several benefits:
- Abstraction — It abstracts UI interactions and locators into separate classes, making the tests more readable and maintainable.
- Code Reusability — You can reuse Page Object classes across multiple tests, reducing duplication and improving consistency.
- Easy Maintenance — If an element's locator or behavior changes, you only need to update it in one place — the Page Object class — and the change propagates automatically to all tests using that Page Object.
- Improved Collaboration — Teams can work more effectively by separating test code from Page Object code, enabling parallel development.
In the next steps, we will explore how to implement the Page Object Pattern in your Playwright tests.
Page Object Implementation
To implement the Page Object Pattern effectively, it is crucial to first understand the web application you will be automating. Let's review the demo website: https://demo.playwright.dev/todomvc/#/.
This is a TodoMVC application, a common example for web automation testing. Here are some of the elements and functionalities you might consider testing:
- Todo Input Field — Where you can enter new tasks.
- Add Button — Clicking this button adds the entered task to the list.
- Task List — A list of tasks where you can mark tasks as complete or delete them.
- Checkbox — Check or uncheck a task to mark it as complete or incomplete.
- Clear Completed Button — Clears all completed tasks from the list.
- Counter — Shows the number of tasks in the list.
- Filters — View All, Active, or Completed tasks.
To implement the Page Object Pattern, you create separate Page Object classes for each of these elements or functionalities. Each Page Object class encapsulates the interactions and methods related to that specific part of the page.
This structured approach makes your tests more modular, maintainable, and reusable.
Create the BasePage
Creating a base page class is a good practice when implementing the Page Object Pattern. This base page class contains common methods and elements shared across multiple pages. Let's create a base page for the TodoMVC application.
import { Page, Response } from '@playwright/test';

class BasePage {
    private readonly url: string = 'https://demo.playwright.dev/todomvc/#/'
    constructor(protected readonly page: Page) {}

    get title(): Promise<string> {
        return this.page.title();
    }

    get pageUrl(): string {
        return this.page.url();
    }

    goto = (): Promise<Response | null> => this.page.goto(this.url);

}

export default BasePage;
Now that we have a base page containing an action method for opening the page via URL, along with two properties for retrieving the page's title and current URL, let's create tests to verify them.
import { test, expect } from '@playwright/test';
import BasePage from '../src/pages/base-page';

test('has title', async ({ page }) => {
  const basePage = new BasePage(page);
  await basePage.goto();

  expect(await basePage.title).toBe('React • TodoMVC');
});

test('get current url', async ({ page }) => {
  const basePage = new BasePage(page);
  await basePage.goto();

  expect(basePage.pageUrl).toContain('demo.playwright.dev');
});
To run these tests, use the command prompt and check whether they pass.
However, we still have some duplication here. Let's simplify the tests by utilizing the beforeEach hook provided by Playwright.
import { test, expect } from '@playwright/test';
import BasePage from '../src/pages/base-page';

var basePage: BasePage;

test.describe('my first page object pattern tests', () => {
  test.beforeEach(async ({ page }) => {
    basePage = new BasePage(page);
    await basePage.goto();
  });

  test('has title', async () => expect(await basePage.title).toBe('React • TodoMVC'));
  test('get current url', async () => expect(basePage.pageUrl).toContain('demo.playwright.dev'));
});
Our tests are now written in a more concise format — just one line each — which is a significant improvement.
Create TodoPage
Let's consider a scenario where our web application consists of multiple pages. Each page should be represented by a different class. The code below demonstrates the Page Object for the main todo page.
import { Page } from "@playwright/test";
import BasePage from "../base-page";

class TodoPage extends BasePage {
    constructor(page: Page) {
        super(page);
    }
}

export default TodoPage;
Here is what's happening in the code:
- We import the necessary modules and dependencies, including the
Pageclass and ourBasePageclass. - We create a new class
TodoPagethat extendsBasePage. This allowsTodoPageto inherit common methods and elements from theBasePageclass. - In the constructor, we pass a
Pageinstance to thesuper()method to initialize theBasePage. - By extending
BasePage, we can add specific methods and elements related to the main todo page, making it easier to write tests for this specific part of our web application.
This approach promotes code reusability and maintainability, as we can create separate Page Object classes for different pages while keeping our test code clean and organized.
Create Todo Page Elements
As mentioned earlier, it is a good practice to create separate Page Object classes for each element or functionality. Let's create the Page Object class for the "TodoApp" element.
import { Locator, Page } from "@playwright/test";

export class TodoApp {
    private readonly newTodoItem: Locator = this.page.locator('header > input');
    private readonly leftTodoItems: Locator = this.page.locator('//*[@data-testid="todo-count"]/strong');

    constructor (private readonly page: Page) {}

    addNewItem = async (newItem: string): Promise<void> => {
        await this.newTodoItem.fill(newItem);
        return this.page.keyboard.press('Enter');
    }

    addNewItems = async (newItems: string[]): Promise<void> => {
        for (let i = 0; i < newItems.length; i++) {
            const newItem = newItems[i];
            await this.addNewItem(newItem);
        }
    }

    getLeftTodoItems = async (): Promise<number> => {
        return Number(await this.leftTodoItems.innerText());
    }
}

export default TodoApp;
Let's recap the key points:
- We define the
TodoAppclass, which represents the "TodoApp" element. - Inside the constructor, we initialize two
Locatorobjects —newTodoItemandleftTodoItems— used to locate specific elements within the "TodoApp." - We create methods for interacting with the element:
addNewItem— Adds a new item to the todo list by filling in the input field and pressing Enter.addNewItems— A utility method for adding multiple items by callingaddNewItemiteratively.getLeftTodoItems— Retrieves the count of remaining todo items.
This Page Object class effectively encapsulates interactions with the "TodoApp" element and provides a clean, modular way to write tests.
Let's include this "TodoApp" in our "TodoPage":
import { Locator, Page } from "@playwright/test";
import BasePage from "../base-page";
import TodoApp from "./page-elements/todo-app";

class TodoPage extends BasePage {
    public pageHeader: Locator = this.page.locator('h1');
    public todoApp: TodoApp = new TodoApp(this.page);

    constructor(page: Page) {
        super(page);
    }
}

export default TodoPage;
With these changes, we now have access to the methods and elements defined in the TodoApp class from within our TodoPage.
Write a Test After Changes
To write a new test after the changes, create a new test file with a name that ends in .spec.ts. Here is an example:
import { test, expect } from '@playwright/test';
import TodoPage from '../src/pages/todo-page/todo-page';

var todoPage: TodoPage;

test.describe('my first page object pattern tests', () => {
  test.beforeEach(async ({ page }) => {
    todoPage = new TodoPage(page);
    await todoPage.goto();
  });

  test('add single todo item', async () => {
    await todoPage.todoApp.addNewItem('newTodoItem');
    const leftTodoItems = await todoPage.todoApp.getLeftTodoItems();
    expect(leftTodoItems).toBe(1);
  });

  test('add multiple todo items', async () => {
    const newItems: string[] = ['newTodoItem1', 'newTodoItem2'];
    await todoPage.todoApp.addNewItems(newItems);
    const leftTodoItems = await todoPage.todoApp.getLeftTodoItems();
    expect(leftTodoItems).toBe(newItems.length);
  });
});
We have organized our tests using the describe and test.beforeEach hooks, following the Page Object Pattern.
However, we still have duplicated code across our two test files:
var basePage: BasePage;

test.beforeEach(async ({ page }) => {
    basePage = new BasePage(page);
    await basePage.goto();
});
and
var todoPage: TodoPage;

test.beforeEach(async ({ page }) => {
    todoPage = new TodoPage(page);
    await todoPage.goto();
});
We can simplify this further by using fixtures.
Test fixtures establish an environment for each test, giving it everything it needs and nothing else. Let's create a fixture file at ./tests/fixtures/fixture.ts:
import { test as base } from '@playwright/test';
import TodoPage from '../../src/pages/todo-page/todo-page';

type Fixture = {
    todoPage: TodoPage;
}

const test = base.extend<Fixture>({
    todoPage: async ({ page }, use) => {
      const todoPage = new TodoPage(page);
      await todoPage.goto();
      await use(todoPage);
    },
});

export default test;
export { expect } from '@playwright/test';
Here is a breakdown of the fixture:
- We import
testfrom Playwright to define our test. - We define a
Fixturetype that specifies what the fixture provides — in this case, atodoPageinstance. - We create a test extension function that sets up the
todoPageand passes it to the test via theusefunction. - We export the test fixture and the
expectfunction from Playwright for use in our tests.
With this setup, our test code becomes significantly cleaner:
Before:
import { test, expect } from '@playwright/test';
import BasePage from '../src/pages/base-page';

var basePage: BasePage;

test.describe('my first page object pattern tests', () => {
  test.beforeEach(async ({ page }) => {
    basePage = new BasePage(page);
    await basePage.goto();
  });

  test('has title', async () => expect(await basePage.title).toBe('React • TodoMVC'));
  test('get current url', async () => expect(basePage.pageUrl).toContain('demo.playwright.dev'));
});
After:
import test, { expect } from './fixtures/fixture';

test.describe('my first page object pattern tests', () => {
  test('has title', async ({ todoPage }) => expect(await todoPage.title).toBe('React • TodoMVC'));
  test('get current url', async ({ todoPage }) => expect(todoPage.pageUrl).toContain('demo.playwright.dev'));
});
Before:
import { test, expect } from '@playwright/test';
import TodoPage from '../src/pages/todo-page/todo-page';

var todoPage: TodoPage;

test.describe('my first page object pattern tests', () => {
  test.beforeEach(async ({ page }) => {
    todoPage = new TodoPage(page);
    await todoPage.goto();
  });

  test('add single todo item', async () => {
    await todoPage.todoApp.addNewItem('newTodoItem');
    const leftTodoItems = await todoPage.todoApp.getLeftTodoItems();
    expect(leftTodoItems).toBe(1);
  });

  test('add multiple todo items', async () => {
    const newItems: string[] = ['newTodoItem1', 'newTodoItem2'];
    await todoPage.todoApp.addNewItems(newItems);
    const leftTodoItems = await todoPage.todoApp.getLeftTodoItems();
    expect(leftTodoItems).toBe(newItems.length);
  });
});
After:
import test, { expect } from './fixtures/fixture';

test.describe('my first page object pattern tests', () => {
  test('add single todo item', async ({ todoPage }) => {
    await todoPage.todoApp.addNewItem('newTodoItem');
    const leftTodoItems = await todoPage.todoApp.getLeftTodoItems();
    expect(leftTodoItems).toBe(1);
  });

  test('add multiple todo items', async ({ todoPage }) => {
    const newItems: string[] = ['newTodoItem1', 'newTodoItem2'];
    await todoPage.todoApp.addNewItems(newItems);
    const leftTodoItems = await todoPage.todoApp.getLeftTodoItems();
    expect(leftTodoItems).toBe(newItems.length);
  });
});
By applying these changes, we have improved the structure of our tests, adhered to best practices, and made our test code more maintainable. The todoPage is automatically provided to each test, eliminating duplication and keeping the tests focused on the actual scenarios.
Conclusion
This guide has walked through implementing the Page Object Pattern in automation testing using Playwright and TypeScript. This pattern is a valuable tool for improving test code organization, reusability, and maintainability. The step-by-step instructions make it accessible for testers at any level to understand and apply the Page Object Pattern effectively.
The addition of fixtures further reduces code duplication and simplifies test setup, enhancing the clarity and maintainability of test files.
This guide serves as a resource for creating efficient and well-structured automated tests using Playwright and TypeScript, highlighting best practices and providing a clear path for implementing the Page Object Pattern successfully.
Resources
- [1] Full repository with code;
- [2] TypeScript documentation;
- [3] Playwright documentation;
elated topics
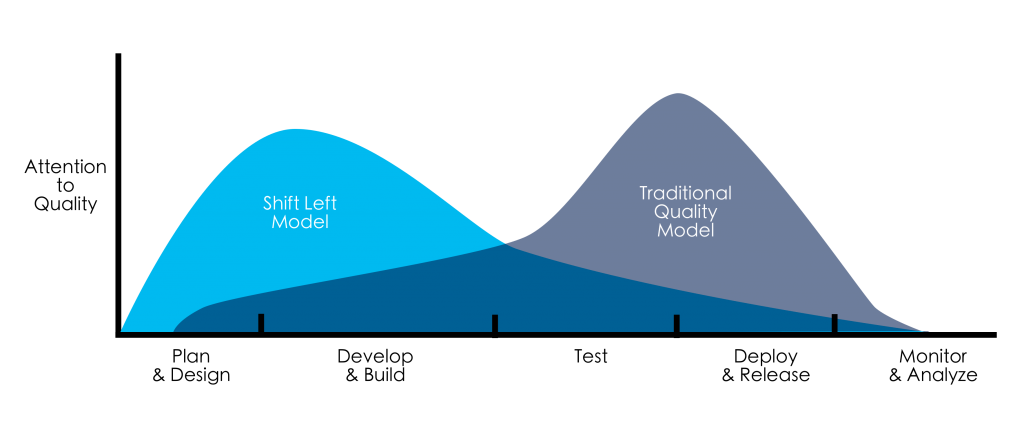
The Power of Left Shifting Testing: Bringing Quality to the Forefront
In the world of software development, ensuring the quality of your product is paramount. Traditionally, testing has been viewed as a phase that occurs after development. However, a paradigm shift is taking place with the adoption of left-shifting testing. In this post, we will explore what left-shif...
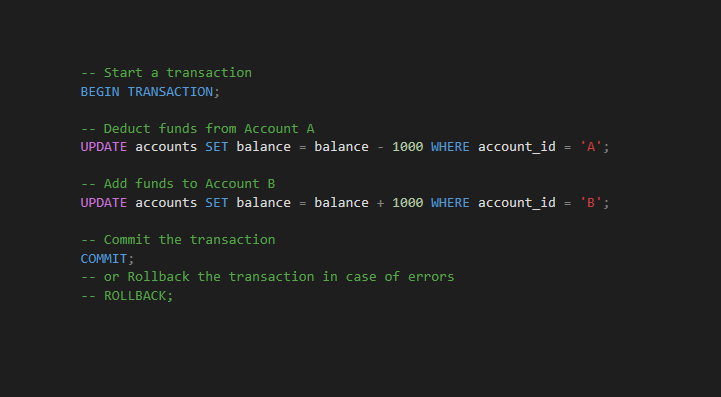
Mastering SQL Transactions: The Power of COMMIT and ROLLBACK in Database Management
SQL transactions are a fundamental aspect of database management that play a crucial role in maintaining data integrity. Among the key components of transactions, the `COMMIT` statement stands out as a linchpin for ensuring that changes made to a database are permanent. In this post, we will explo...

🌟 Functional Programming in Automation Testing with TypeScript and Playwright 🤖🚀 Part II
Welcome to the second part of our exploration into functional programming in automation testing. In this continuation, we will delve deeper into the practical implementation of the concepts we've discussed so far. Here's what you can expect in this part: Here are step-by-step instructions for i...